Mac Recovery Partition, we also call it macOS Recovery, is part of the built-in recovery system of your Mac running in OS X 10.7 Lion and newer. It can help you to restore from Time Machine, reinstall macOS, get help online, repair or erase a hard disk, and more.
"How do I reinstall Mac from Recovery Partition?"
"How do I create a Recovery Partition for High Sierra?"
"Mac partition recovery mode is not working."
The more questions you can find from Apple Discussion.
Here, we gather the full guide to use Recovery Partition on Mac, including boot and fix it.

Recovery Partition on Mac
As mentioned above, Recovery Partition on Mac is created for helping you to restore data, erase hard disk and reinstall macOS. No matter what you want to do, you should reboot Recovery Partition on Mac firstly.
Step 1Turn off Mac and turn on it. On turning it on, press and hold down both the Command key and R key, which will direct your computer to start up from the Recovery Partition.
Step 2Release both keys once you see the Apple logo appear in the middle of the screen, and your Mac will enter into Recovery Mode or spinning globe.
Note: Newer and some older Mac computers will automatically try to start up from macOS Recovery over the Internet, when unable to start up from the built-in recovery system. Then you will see a spinning globe, instead of Apple logo.
Step 3After the startup is complete, you should see the utilities window.
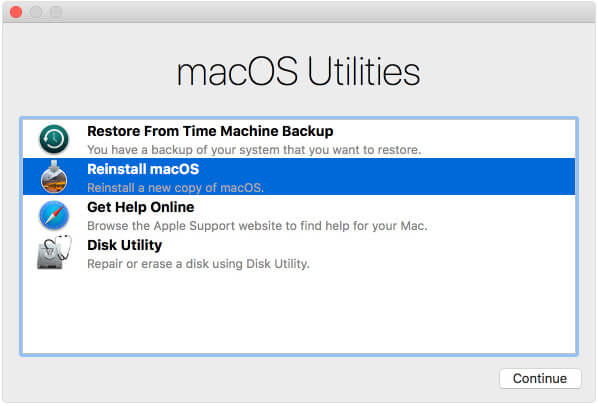
Then it gives you 4 options, Restore From Time Machine Backup, Reinstall macOS, Get Help Online, and Disk Utility.
After entering into Recovery Partition, let's see how it works now.
If you have made a backup of your system, then you could restore your Mac from Time Machine in this way.
One thing you may notice that, the restore is the whole data restore to replace all existing data on your Mac. To some extent, Time Machine restore is to Mac what iCloud/iTunes restore on iPhone/iPad/iPod.
For avoiding the forcible data overwritten for all, we recommend Aiseesoft Mac Data Recovery.
It is the data recovery software for Mac users, to recover deleted or lost photos, videos, audio, documents, and other data, whether your Mac is crashed, emptied trash, unexpectedly operations, or partition deleted, virus attack, even other accidents. Moreover, it lets you recover overwritten, unsaved, permanntly deleted files on Mac easily.
Note: For Mac running Mac OS X El Capitan or later, you need to disable System Integrity Protection firstly for using some software, like Mac Data Recovery on your Mac to acquire some permission to scan it.
Step 1Run Mac Data Recovery
Free download Mac Data Recovery on your computer, install and run it immediately.
Click "Mac Data Recovery".

Step 2Scan Mac
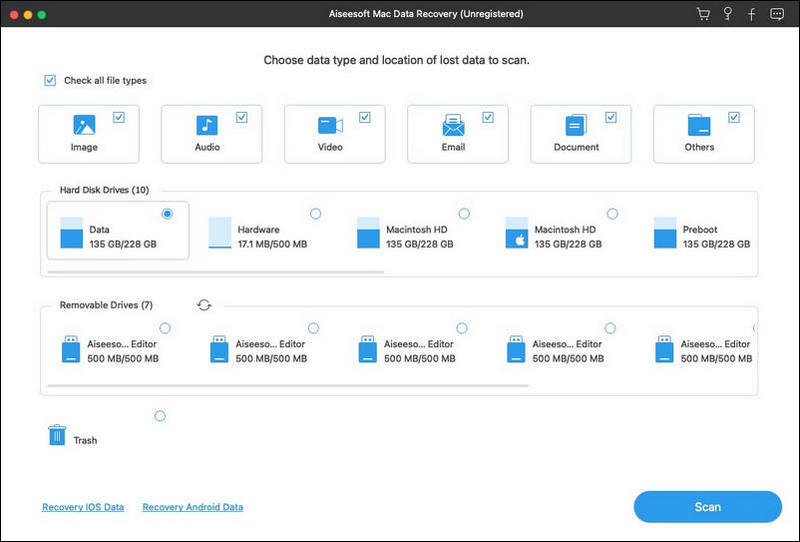
After launching, you need to checkmark the data types and disk drive for scanning in the main interface.
As for data type, you are able to scan images, audio, video, email, documents and other data.
As for the drive, you need to tick your Mac drive.
Moreover, this software also lets you scan the external drive on your Mac, like camera card, flash drive card, and more.
Click "Scan" to start a quick scan on your Mac.
Step 3Restore data from Mac
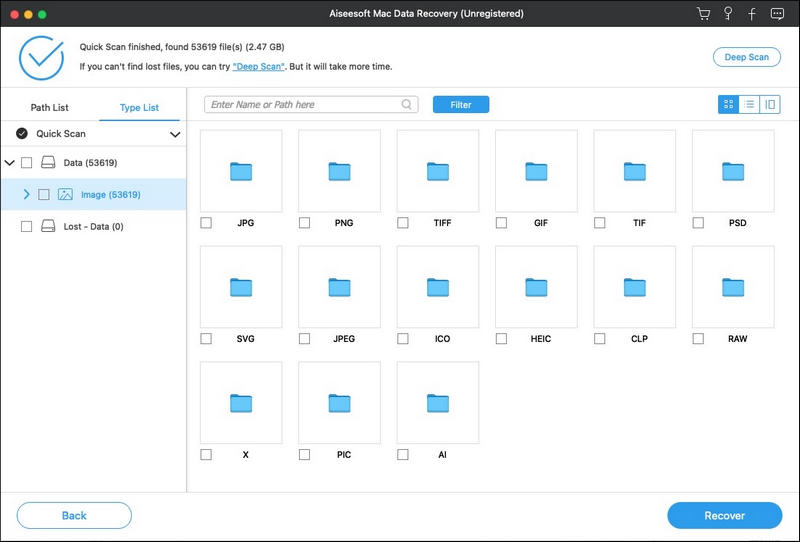
After the scan is complete, you will find all your data types listed in the result. From the left pane, you can see the data types, click it to view the data details in the right window and click "Recover" to extract the lost or deleted data to your Mac.
This option will help you to download and reinstall the Mac operating system.
The reinstallation version of macOS depends on the key combination you used during startup.
Before you do it, do not forget backup Mac to protect your important data.
This link will direct you to visit Apple's support website by opening your browser. However, browser plug-ins and extensions are disabled.
Disk Utility function enables you to repair and erase hard disk.
These additional utilities are available from the Utilities menu in the menu bar:
Moreover, such additional utilities are also accessible from the Utilities menu, as Firmware Password Utility or Startup Security Utility, Network Utility and Terminal.
If you regret the boot of Recovery Partition, just quit it. Choose "Restart" or "Shut Down" from the Apple menu.
Generally speaking, you do not need to download Recovery Partition, because it is the built-in since OS X 10.7 Lion, when Apple stopped selling boxed copies of its operating systems. However, for one reason or another, you may need to create a one on Mac for backup with USB flash drive.
Here are the steps.
Step 1Download a copy of the "Install OS X" or "Install Mac OS X" from the Mac App Store under the "Purchases" tab. You should match the macOS version with your Mac, for example, the "Install macOS Mojave". Meanwhile, insert USB flash drive into your Mac.
Step 2Open Disk Utility (in the "Utilities" folder inside the "Applications" directory.), select the "Volume" in the sidebar, and the Volume is in the top part, not underneath.
Step 3Click "Erase", and make sure it says "Untitled" without changing it. Click "Erase".
Step 4Open Terminal, cut and paste the correct create install media text into Terminal.
For example, for creating macOS High Sierra, just use the following codec:
sudo /Applications/Install\ macOS\ High\ Sierra.app/Contents/Resources/createinstallmedia --volume /Volumes/Untitled --applicationpath /Applications/Install\ macOS\ High\ Sierra.app --nointeraction
Step 5You will need to type your admin account password when prompted, enter "y" and press Return.
Then it will wipe out your flash drive firstly, and then turn it into a bootable installer.
Wait a second, and you will complete the whole process.
If you have created a backup of the latest macOS installer, and want to free up about 600 MB of disk space on your Mac, then deleting Recovery Partition will be an idea.
Step 1pen Terminal app and enter the following command:
defaults write com.apple.DiskUtility DUDebugMenuEnabled 1
Step 2Open the Disk Utility app. Select "Debug" in the menu bar at the top > "Show every Partition".
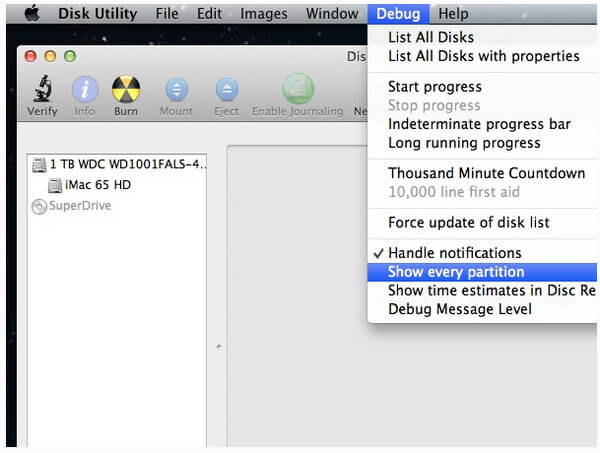
Step 3At the top, select "Recovery HD" > Click the Mount icon to make it active, and you will see it no longer grayed.
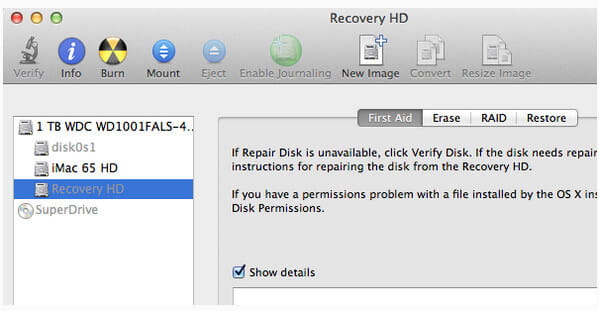
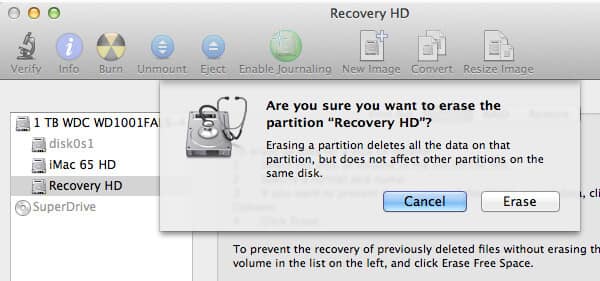
Step 4Secondary-click on the mouse and then selecting "Erase" to delete partition recovery.
Step 5Select the "Partition" tab > Click to select the small Recovery HD partition > Click the minus symbol, beneath, to remove it.
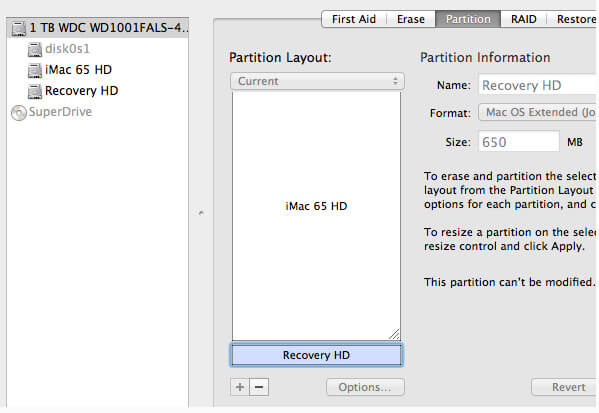
Then a conformation dialogue will pop up, and you just need to read it and confirm the action to delete it.
Step 6After deleting partition recovery on Mac, you can check if it has been removed.
Go to Terminal app and enter the following command:
diskutil list
Then you will see it has been deleted from your Mac.

For exiting Debug menu, you just need to type the following command into Terminal app:
defaults write com.apple.DiskUtility DUDebugMenuEnabled 0
Then just closing Terminal and Disk Utility is the last step.
Recovery Partition is very important for Mac users. However, once you find Command + R not working, and you can boot into startup, you should know how to fix it.
Here are the some basic solutions.
If you can connect your Mac online, you can try Internet Recovery to fix the issue.
Get the details to use Internet Recovery Mac.
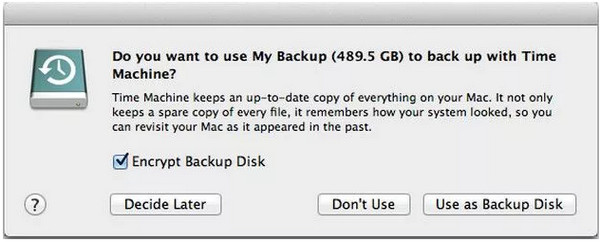
As mentioned above, Time Machine can help you restore Mac exactly.
Step 1Reboot your Mac and press "Option" when you hear the startup music.
Step 2Connect your external hard drive with Time Machine backup to Mac and it will come out.
Step 3Choose the Recovery Drive to launch Mac.
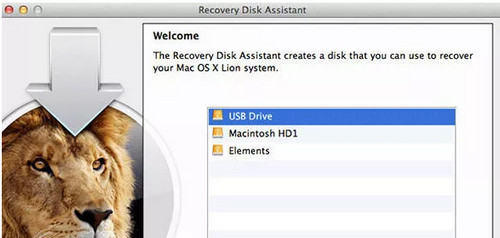
If you have created the Recovery Partition, then here you are gaining another one opportunity to fix this problem by using the USB flash drive copy.
Step 1Reboot your Mac and press "Option" when you hear the startup music.
Step 2Connect your USB flash drive with the backup to Mac and it will come out.
Step 3Choose USB flash drive to launch Mac.
This is the last solution we can suggest. However, reinstalling macOS will erase all content and data on Mac currently. So you should think twice.
Conclusion
This page mainly talks about the Recovery Partition on Mac, and how to use it. You can boot, create or delete it with the detailed guide. Moreover, when Recovery Partition on Mac is not working, you can also follow the solutions above to fix it easily.