Summary: Want to record a Webinar on Mac? If you want to know the detailed steps of how to capture Webinar videos with QuickTime Player, you are at the right place. This post will introduce you with the best Webinar recorder to help you save the valuable Webinar contents on your Mac.
"I need to record a webinar. Can that be done with iMovie and if so, how?"
"I want to record a very important webinar video conference on my MacBook Air. I prefer to capture the webinar video with the screen recording feature of QuickTime Player. Is there any time limit?"

Nowadays, many video chatting platforms like Skype, FaceTime or Google + offer the individual and group-based chat service. You can easily make video/audio calls or other kinds of communications. While for some professional events meant to deliver presentations to larger audiences, you may turn to the Webinar.
Webinar provides a convenient way to hold a video conference. Anyone is allowed to attend or watch a Webinar. This post will give you a simple introduction of Webinar. In addition, you will learn how to record Webinar on Mac or Windows PC.
Webinar is a kind of live web-based video conference which provides a one-way only communication. Users can connect the individual hosting the webinar to an audience. In a webinar, only one person (the host) is expressing ideas and others attend.

Webinar offers a convenient way to tell stories, reach more people and grow business. As a host of webinar, you are allowed to invite guests (viewers and listeners) from all over the world, share your thoughts, show your slideshows or demonstrations, and do other communications. If you are an audience, you can ask questions and chat with host.
Now Webinar has become a great way to learn something new and to ask experts for advice in real-time. You can easily get lots of important information from webinars with various topics.
But one thing you may notice that, Webinar is no longer available for later viewing as soon as the webinar is over. That's why many people on the internet are looking for the method to record webinar.
If you are a Mac user and have the need to capture a webinar content, QuickTime Player will definitely be the first thought in your mind to get the video recording job done. Now you can take the following guide to record a webinar on Mac.
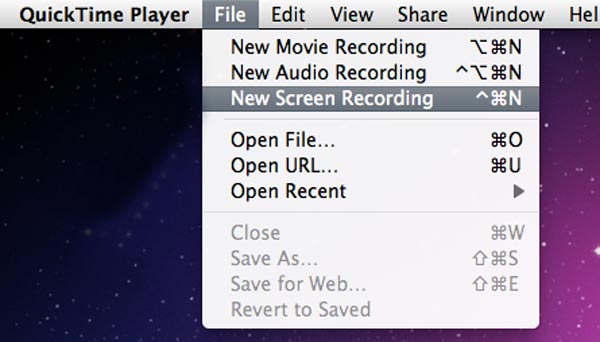
Step 1 First, you need to run QuickTime Player on your Mac. Click on File on the top bar and then choose New Screen Recording from the drop-down list.

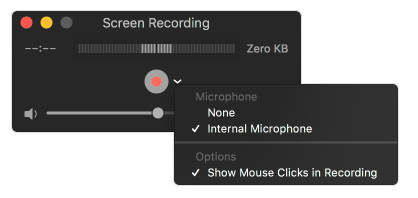
Step 2 You will see a new screen recording window appear. Before recording Webinar, you can adjust various settings by clicking the small triangle button. During this step, you can attend the Webinar and prepare for the Webinar capturing on Mac.

Step 3 When the webinar begins, you can click the red Record button to start recording webinar content. You can capture the entire screen or customized screen based on your need.
Step 4 When the webinar is over, hit the Stop button to finish the webinar capturing on your Mac. After that, you can preview the recorded webinar video and decide whether you want to save it or not.
If the audio track is all you need, you can only record Webinar audio with the QuickTime Player. One thing you should know first, the captured Webinar can only be saved in MOV format. (Find other screen recorder for Mac here)
In order to give you a better webinar recording experience and high-quality output file, here we recommend the other Webinar recorder to help you capture Webinar screen on your Mac. Compared with QuickTime Player, the recommended Webinar Screen Recorder offers more functions for the Webinar recording. More importantly, the captured webinar can be saved in any popular video format you need, such as MP4, MOV, WMV, AVI, and so on.
Step 1 Run Webinar recorder for Mac
Free download, install and run this powerful Webinar video recording software on your Mac.

Step 2 Set recording area
Similar to QuickTime, this webinar recorder also enables you to customize the screen recording area. You can set a full screen, fixed region or custom region as you like.
Step 3 Set audio settings
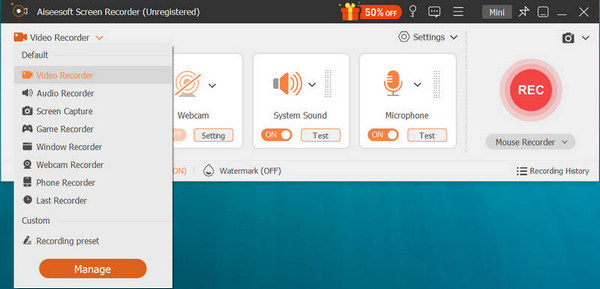
If you want to record Webinar with audio, you can adjust audio settings by clicking the microphone-alike button. This webinar recorder allows you to recording Webinar audio from system audio and microphone voice. Here you are suggested to keep both sound sources.
Step 4 Record Webinar on Mac
Click the REC button to start recording Webinar on Mac. Hit the Stop button when the Webinar is finished. Then you can view the captured webinar video and save it on your Mac.
If you are a Windows computer user and have the same need to record webinar, you should pay more attention to this part. As you can see from above, the introduced webinar recorder also offer a Windows version. So you can free download it and take the next steps to record webinar.
Step 1 Double click the download button above to download and install this professional webinar recording software on your computer. Open it and choose the Video Recorder option.

Step 2 After that you can handily set the recording area and audio source.

Step 3 When the Webinar starts, you can click the REC button to begin the webinar recording. Then click Stop button when the Webinar is over.
We have talked about how to record Webinar on Mac and PC in this page. Hope you can find your preferred way to capture Webinar screen after reading this post. If you have any better webinar recorder, you can tell us in the comment.