If you want to save the space of your iPad, you may need to delete some photos of your iPad as it will take a lot of space in your iPad internal memory. When you do not want to delete iPad photos and also want to save the space, maybe you can transfer the iPad Photos to Mac for backup.

How can I transfer iPad photos to Mac?
This article will introduce an effective transfer to you to transfer your iPad photos to Mac easily. Aiseesoft iPad to Mac Transfer is a powerful transfer which can not only transfer iPad photos to Mac, but also transfer music, contacts, videos, messages, PDF files, etc. to Mac. With this transfer, you are able to freely transfer many kinds of files from iPad to Mac. What you need to do is to download and install it on your computer.
You can transfer iPad photos to Mac as below steps:
Step 1 Download iPad to Mac Transfer
You can download and install iPad to Mac Transfer on your Mac. After download this software on your appointed place, you need to install it according to the guide. The whole procedure will take you a few seconds.
Step 2 Connect your iPad to Mac
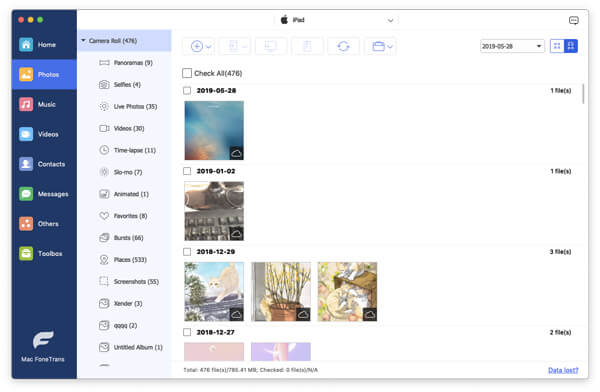
Open this software, and connect your iPad to Mac via USB cable. You will find the interface as the following picture. If it is the first time that you connect your iPad to Mac, please make sure your iPad get trust of the Mac.

Step 3 Find out your photos on the transfer
Click Photos on the left side. You will get all the photos of your iPad on the main interface of this software. Next you are able to choose the photos which you want to transfer from iPad to Mac.

Step 4 Transfer photos to Mac
Click "Export to Mac" to choose a destination and the photos will be moved to your Mac with high speed. Or you can also select. In addition, you can also transfer iPad movies, songs to your Mac.

Click here to learn more info about Recover Deleted Photos from iPad.
You can also learn more the product with the following video guide:

