There are many reasons why you need to change your mouse cursor effects. Sometimes, people are just tired of the same old arrow. In most cases, we have to adjust our cursor colors and size for better visibility. When you create a video tutorial, for example, the special cursor effects are able to attract audiences' attention.
In this tutorial, we are going to tell you 3 ways to change your mouse cursor, when capturing your screen with the best screen recording software.

Change Mouse Cursor
Recommend: Aiseesoft Screen RecorderGo To Mac

The moving object is able to attract audiences' attention, so you can show your mouse cursor to guide people's focus. And if you have installed Screen Recorder on your computer, the thing can be easy.
Step 1 Launch Screen Recorder from your desktop and choose Video Recorder in the home interface. That will open the Video Recorder window.
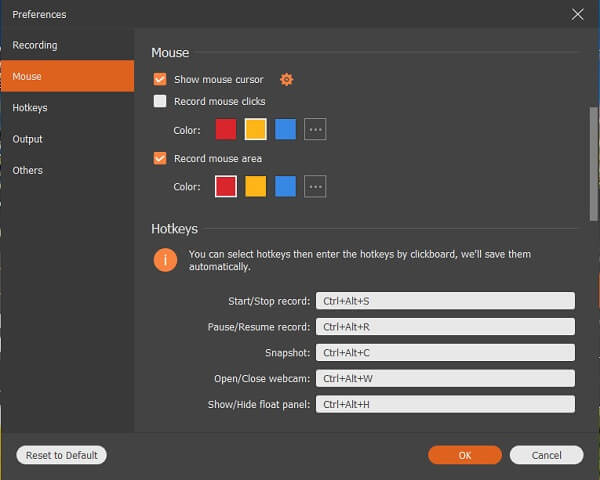
Step 2 Locate the upper right corner and you will find a mouse icon next to the More settings label. Click on the mouse icon, you will be presented the Mouse tab on the Preferences dialog.
Step 3 Tick the checkbox in front of the Show mouse cursor option. Press the OK button to save the setting. Now, you can try to record something on your screen to test if your cursor is working.

If you do not like the style of your cursor, you can change it following the steps below.
How to change your mouse cursor
Step 1 Go to the Preference dialog by hitting the gear icon at top right corner of the Video Recorder window, and then locate the Mouse tab.
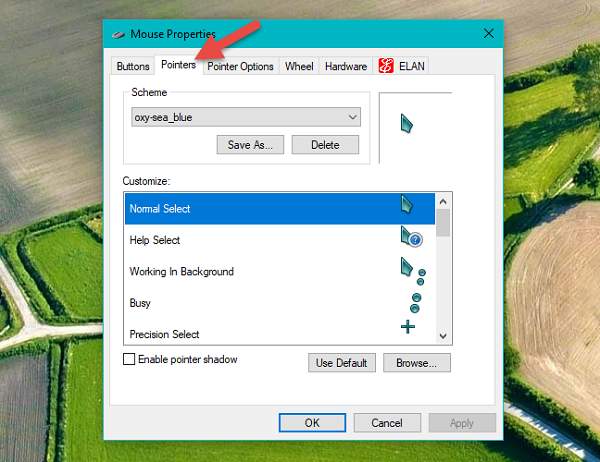
Step 2 Find the Settings icon next to Show mouse cursor and click on it. Now you will be taken to the Mouse Properties dialog. To change the style of your mouse cursor, select the Points tab and choose your favorite effect from the Scheme dropdown list.
Step 3 Click on the OK button to save the mouse cursor effect.

How to highlight mouse clicks
Step 1 Open the Preferences dialog in your Screen Recorder and go to the Mouse tab.
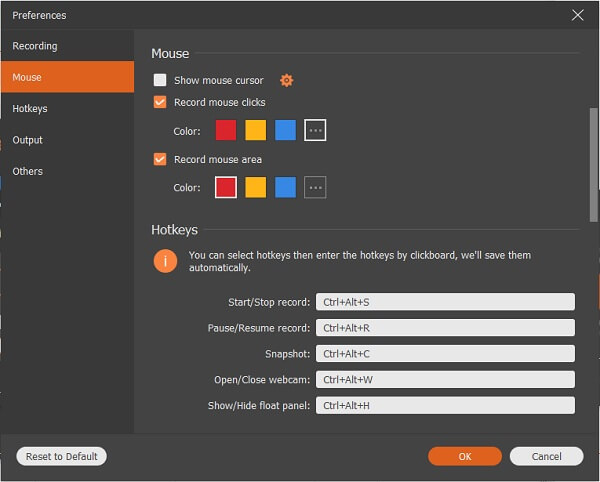
Step 2 Check the box next to the Record mouse clicks option and select your favorite color, like red, yellow or blue. To set mouse clicks with other color, hit the button with three-dot icon to open the palette.
Step 3 Finally, click on the OK button to confirm it and close the Preferences dialog.

How to highlight mouse area
Step 1 Also, navigate to the Mouse area on the Preferences dialog.
Step 2 Locate the Record mouse area option and tick the checkbox next to it. You are allowed to set the color of mouse area. In addition to red, yellow and blue, you can choose your desired color on the palette too.
Step 3 Bear in mind to hit the OK button at bottom to save your setting.
Mouse cursor is not always necessary. If you are recording an online video, for example, you may need to hide your mouse cursor. Screen Recorder permits you to remove the mouse cursor from your screen simply.
Step 1 Run Screen Recorder after installing it on your machine. Go to the Video Recorder window, and hit the mouse icon to open the Mouse Setting dialog.
Step 2 There are three options related to mouse cursor:
Show mouse cursor is used to control the mouse cursor during recording.
Record mouse clicks will highlight your clicks.
Record mouse area will highlight the area that your mouse covers.
Uncheck the boxes next to Show mouse cursor and other options. That will hide your mouse cursor completely.
Step 3 Press the OK button, and now you can feel free to record videos.
In Aiseesoft Screen Recorder, you can configure almost every detail of how your mouse cursor works. Compared to other screen recording software, it offers simplified access to the mouse settings dialog, where you can change mouse cursor effects. At the same time, it allows you to access the more detailed Mouse Properties window with more options. Getting your desired cursor effects may need several attempts, but we believe that you can achieve it quickly with our guides above. If you have any questions regarding mouse cursor settings, please let us know in the comments below.